Quick start guides
New to Univerge Blue Connect? This user guide will give you the knowledge to get up and running fast!
CHOOSE YOUR APP TYPE
MOBILE APP QUICK LINKS
Univerge Blue Connect mobile app
 |  |
The Univerge Blue mobile app transforms your mobile phone into an essential collaboration tool, making teamwork on-the-go easier than ever. Users can see who is available, send and receive team chats and messages, place calls, and see voicemails all from one application—anytime, anywhere.

CALLING
Placing calls
There are multiple ways to place calls in the Univerge Blue application.
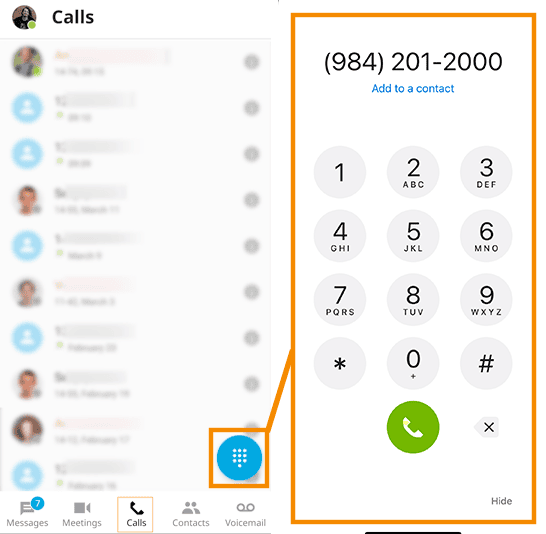
Placing a call through the phone dialer
- Tap either the "Calls" or "Contacts" icons on the bottom of the screen
- Tap the blue dial pad icon
- Use the dial pad to enter a phone number
- Tap the green phone icon to place the call
Placing a call through team chat
- Navigate to the chat of the individual you wish to call
- Tap the blue phone icon on the top of the chat window
Placing a call through the call history tab
- Tap the "Calls" (phone) icon on the bottom of the screen
- Tap the call record of the person you wish to call
Placing a call through the voicemail tab
- Tap the voicemail icon on the bottom of the screen
- Tap the voicemail message of the person you wish to call to reveal more options
- Tap the phone icon to place the call
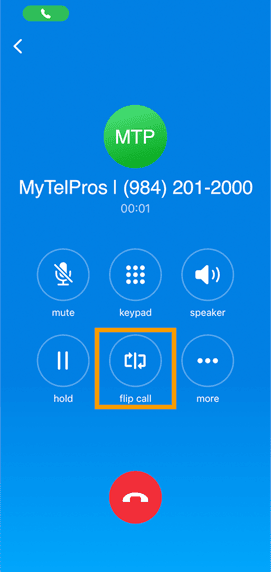
Call flip
Call flip allows you to seamlessly move an active call to another device. For example, from your desktop application to your mobile phone.
- While on an active call, tap the call flip button
- The call will be placed on hold
- All other devices assigned to you will begin ringing (desk phone, desktop app, etc.)
- Answer the call on the desired device and continue the conversation
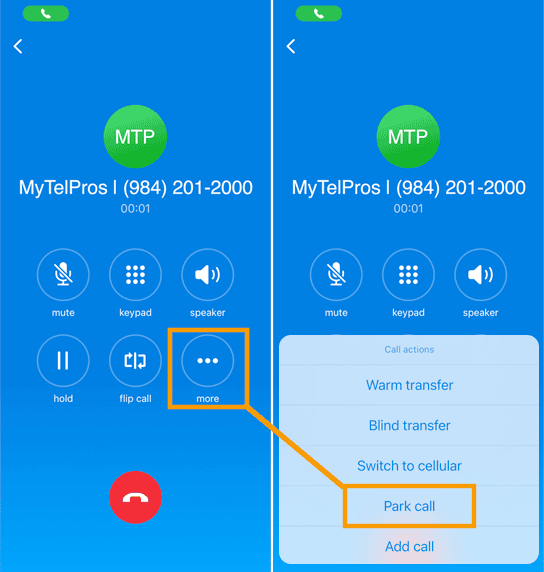
Call park/pickup
Parking a call is like placing it on hold, but with one major difference – a parked call gets placed in a communal "call parking lot" where another available coworker can pick them up. A call remains "parked" until someone picks it up again.
Parking a call
- On an active call, click the "..." more button
- Tap "Park call" from the menu
- An automated voice will tell you the number of the parking slot the call was placed in
(example: "call parked on extension 901") - The call can be picked up by anyone within the organization by calling that extension number
Picking up a call
- Dial the extension number of the parking slot from any phone
Transfer a call
Transferring a call to a teammate is easy, but it will help to understand the 3 different transfer types.
Warm transfer
Warm transfer allows you to consult with the party you are transferring a call to before completing the transfer.
- While on an active call, tap the "..." more button
- Tap "Warm transfer" from the menu
- Select a contact or use the keypad to type a phone number
- Your first call will be placed on hold, you will receive an incoming call from Caller 2; you will then need to select the Answer button to establish a call with caller 2
- Tap on the "Complete transfer" button to transfer the call
Blind transfer
The blind transfer allows you to transfer the call without having a conversation with another party.
- While on an active call, tap the "..." more button
- Tap "Blind transfer" from the menu
- Select a contact or use the keypad to type a phone number
Add a caller
You can conduct 3-way calls using your Univerge Blue application or desk phone.
- While on an active call, tap the "..." more button
- Tap "Add call" from the menu
- The first call will automatically be placed on hold
- Use the dialer to type the number of the person you wish to add (or select a contact from your contact list)
- Click the merge call icon to create the 3-way call
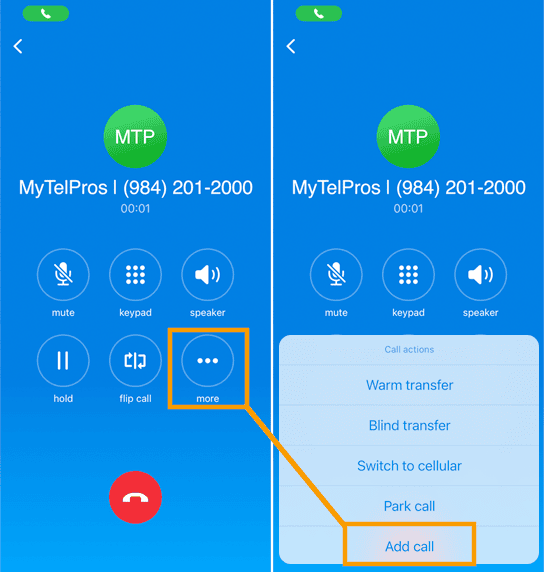
Note: larger conference calls can be conducted by using Univerge Blue Meet (included with your Connect plan).
TEAM CHAT
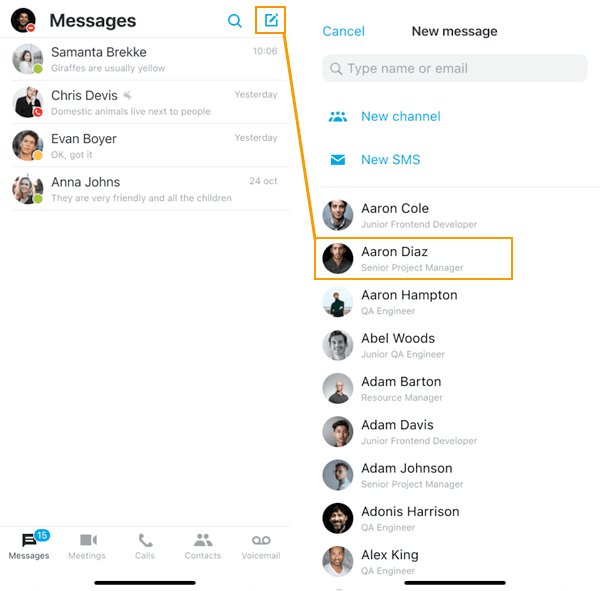
Send a direct message
A direct message is a 1-on-1 conversation with another member of your organization.
- Tap the "New chat" icon (see image below)
- Use the search bar, or tap on the contact you want to chat with
Create a channel
A channel is a group chat with multiple members of your organization.
- Tap the "New chat" icon (see image below)
- Tap "New channel" from the list
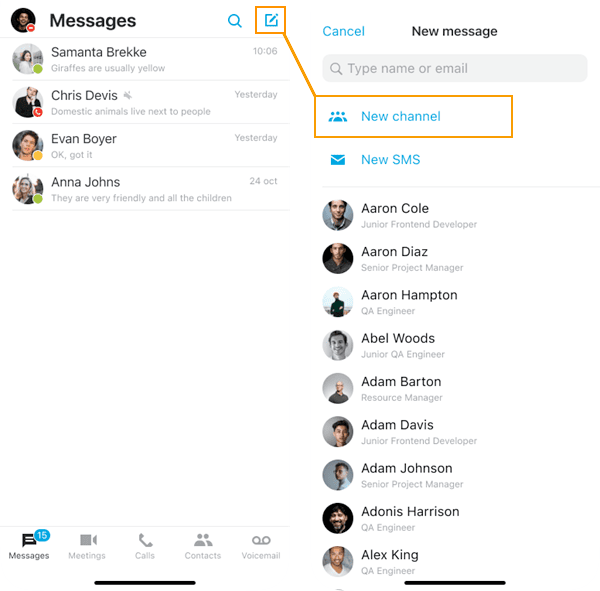
- Name the channel
- Set privacy settings (public or private – see below)
- Use the search bar, or tap on the contacts you want to add to the channel
Channel privacy settings
A chat channel can be set to either private or public.
Public channels
- Available for every user in your company
- You may search for public channels and join or leave them
- Other users may join your public channels
Public channels
- Available for its members on
- Users may only join by invite
Pinning a chat
As you receive chat messages, the newest messages will automatically appear at the top of your list, an older messages will be pushed down the list.
To keep important chat threads at the top of your list, you can pin them, and incoming messages will not push them downward.
- Swipe left on the chat you want to pin, to reveal more options
- Tap the orange pin icon
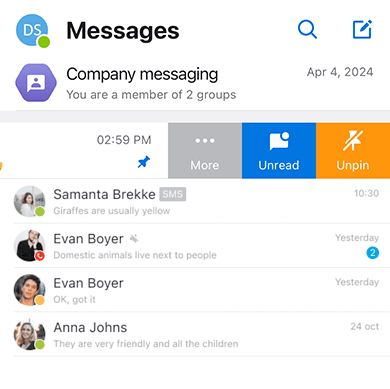
Note: Pin preferences are not synchronized between user's devices and are unique for each device.
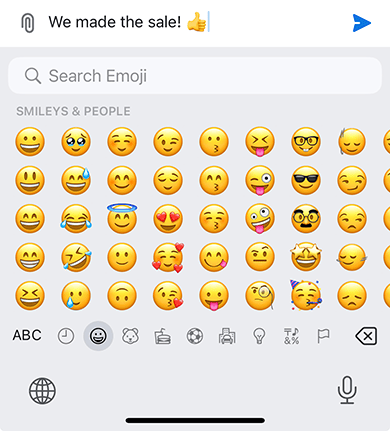
Emojis
Customize your chat with your favorite emojis or animated GIFs.
- Connect supports iPhone and Android emojis
- Use the emoji keyboard built right into your phone to type them into chat
Reactions
You can react to messages with predefined emojis.
- Long press on the message you want to react to
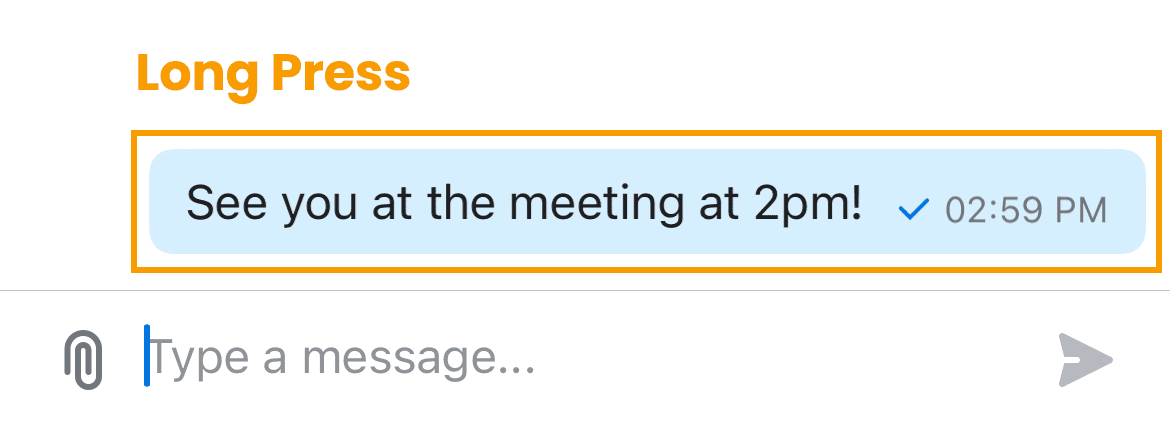
- A list of emojis will appear on your screen
- Tap the emoji you wish to send
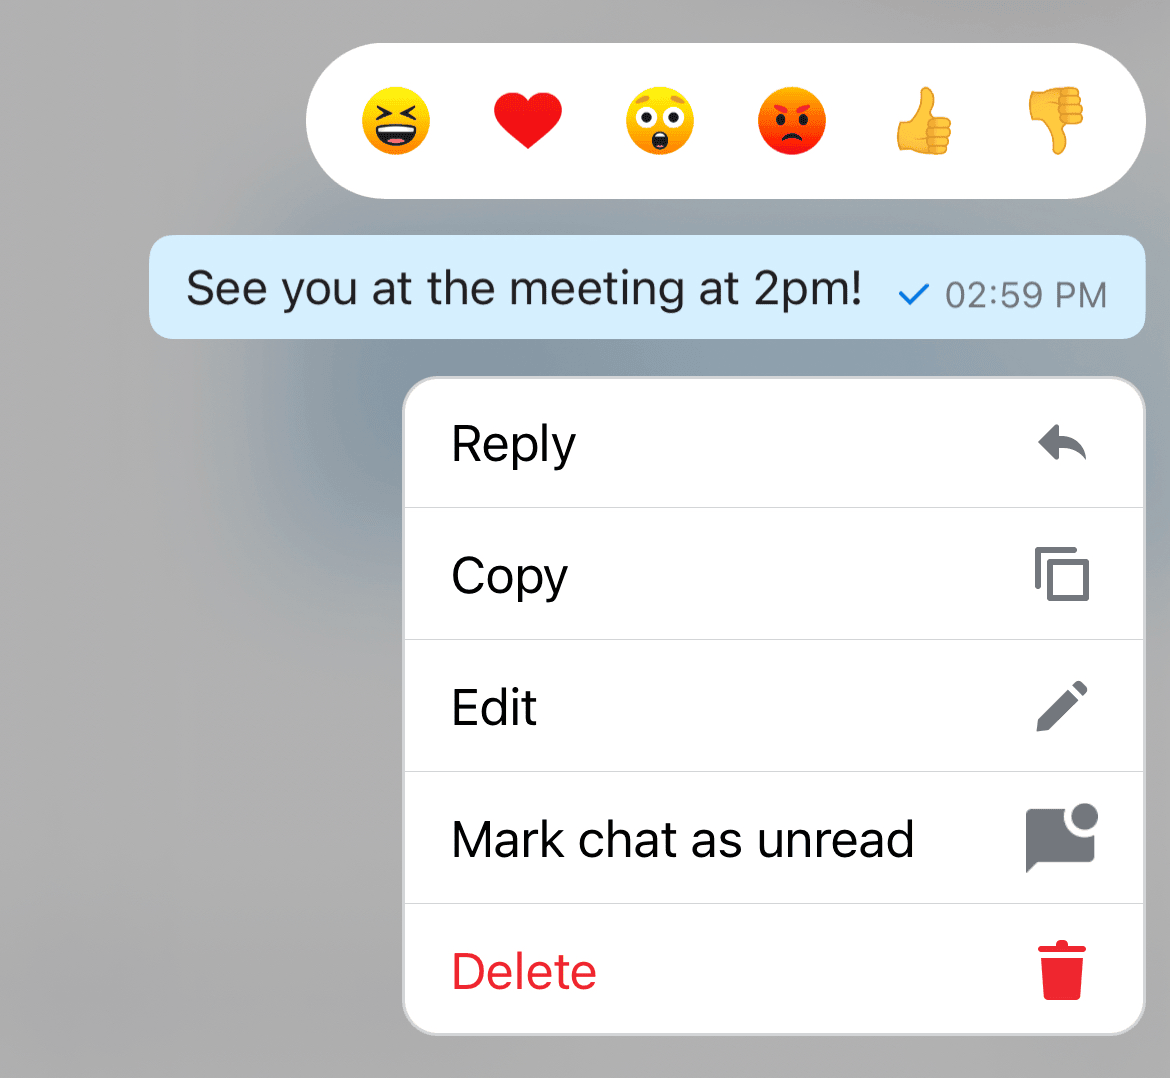
For messages with multiple reactions, you can tap on a reaction and see who exactly sent it.
Sending files
Files can be easily sent in both 1-on-1 or group messages.
- Tap the paperclip attachment icon next to the text field
- Select the photo or file you wish to send
- Tap the "Send" button

Silent mode
Silent mode is a helpful feature for users who do not want to be disturbed by calls, voicemails, messages, or missed call notifications outside of work hours.
PRESENCE
Status descriptions
The presence feature helps to indicate which co-workers are available, busy, or away.
Your presence status is displayed as a colored dot on your profile avatar.
Important: Do Not Disturb/Out sick/On vacation/Off work puts all of a users devices in DND mode. It will affect not only the app it was activated on, but desk phones as well. If Do Not Disturb/Out sick/On vacation/Off work is activated on Desktop, Mobile app will not ring either and vice versa.
If you wish to stop receiving notifications only on your mobile phone, click here for instructions on enabling silent mode
| Icon | Status | Description |
|---|---|---|
 | Available | Automatic or Manual Indicates that a user is available to chat or talk on the phone. |
 | Away/ on-break | Automatic Indicates that a user has been inactive for a certain period of time. This feature is designed to help prevent the user from appearing as available when they are not actively using the app. |
 | Busy | Manual When a user wants to indicate that they are busy and may not respond right away. |
 | Offline | Automatic When all user’s applications go offline. |
 | On a call / in a meeting | Automatic When a user is on a call or in a Univerge Blue meeting (MEET). |
 | Screen sharing | Automatic When a user is performing a screen share in a Univerge Blue meeting (MEET). In this status, call and chat notifications will be disabled. |
 | Do not disturb | Manual When a user doesn't want to get any notifications wants to send all incoming calls to voicemail. In this status, calls that came through a hunt group would still ring to you. |
| | Out sick | Manual When a user wants to notify that they are unavailable due to being sick. Out sick status works in the same way as Do not disturb. |
| | On vacation | Manual When a user wants to notify others that he or she is unavailable due to being on vacation. On vacation status works in the same way as Do not disturb. |
| | Off work | Manual When a user wants to notify others that he or she is unavailable due to being off work. Off work status works in the same way as Do not disturb. |
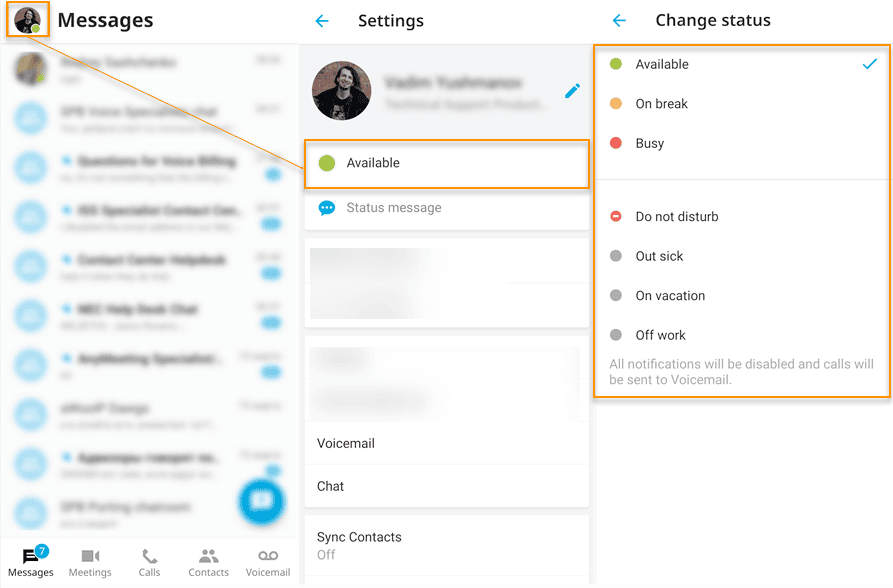
Changing your status
Choose from a set of predefined status messages, or add your own custom status.
Important: Do Not Disturb/Out sick/On vacation/Off work puts all of a users devices in DND mode. It will affect not only the app it was activated on, but desk phones as well. If Do Not Disturb/Out sick/On vacation/Off work is activated on Desktop, Mobile app will not ring either and vice versa.
- Tap on your avatar, in the top corner of the screen
- Tap on your current status
- A list of status options will appear
- Tap on your desired status
- You can also set a custom status message by tapping "Set your status message"
If you wish to stop receiving notifications only on your mobile phone, click here for instructions on enabling silent mode
VOICEMAIL
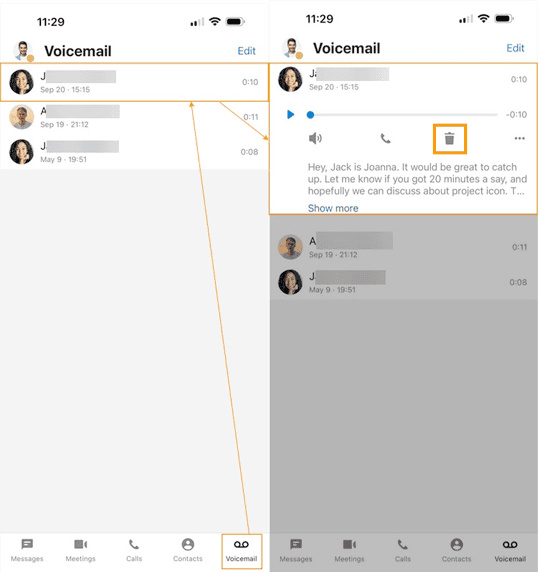
Checking new voicemail
- Tap the voicemail icon on the bottom of the screen
- Voicemail messages will be arranged by date
- Tap a voicemail message to see its details

- The audio player will appear
- Tap the play button to listen to the message
- Tap the phone icon to call back the person
Deleting Voicemail
- Select the voicemail by tapping it
- Tap the trash can button
- You’ll be prompted for confirmation on deleting the message
- Tap Delete to confirm
- Deleting a message will delete it from all of your devices – including your desk phone
- Once deleted, the message can not be recovered
When the voicemail box becomes 80% full, you will see an orange notification banner.
Important: when a voicemail box becomes 100% full, new voicemail messages will stop appearing in it.
Silent mode
Silent mode is a helpful feature for users who do not want to be disturbed by calls, voicemails, messages, or missed call notifications outside of work hours.
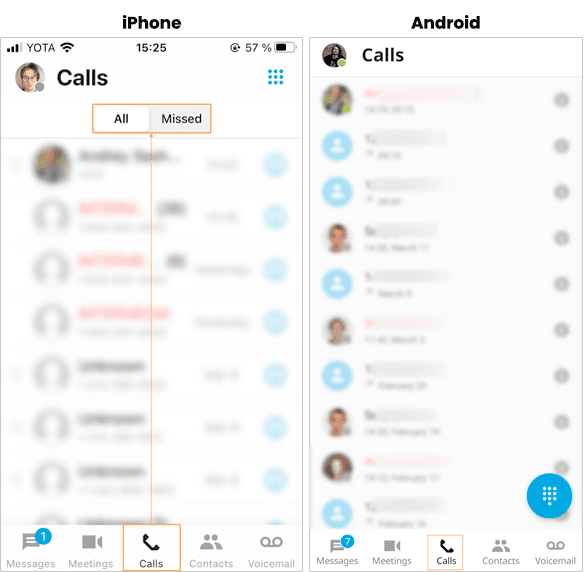
CALL HISTORY
The call history page allows you to view all calls or missed calls.
Missed calls are displayed in red.
Note: On an iPhone you can switch between "All" and "Missed" calls, by tapping on the buttons on top of the screen.
- Tap the "calls" (phone) icon on the bottom of the screen
- Tap the "info" ( i ) icon to the right of the call record for more details about the call
- Tap the call record to call the person back
VIDEO CONFERENCING
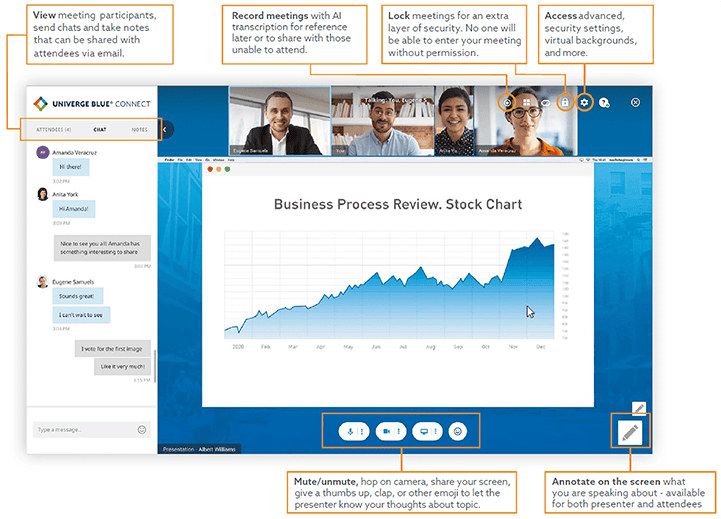
Univerge Blue MEET overview
Meet face-to-face with your team and clients with Univerge Blue Meet – included with every Connect plan. Increase collaboration with audio, video, screen sharing, and in-meeting chat from any device. Meet is fully integrated with the Univerge Blue Connect apps, so chat conversations can easily become video meetings.
Starting a meeting
There are multiple ways to start a new meeting in the Univerge Blue desktop app.
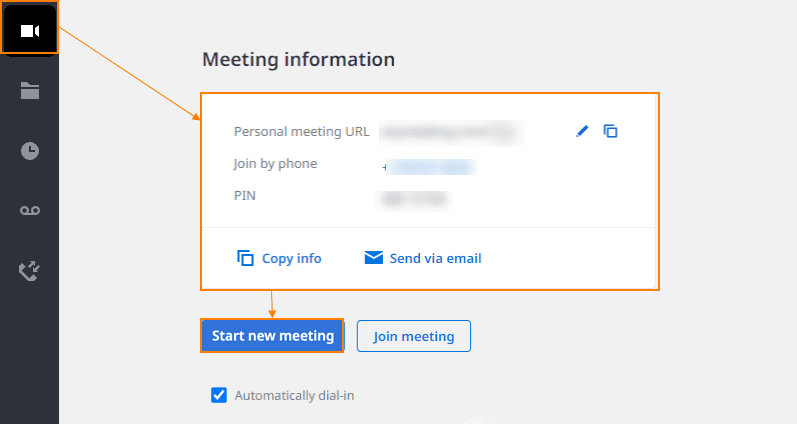
Starting a meeting
Use this when you want to start a meeting alone, and invite teammates or external parties at a time of your choosing. This would also be useful to start an audio conference call.
- Click the video camera icon on the left-hand black sidebar
- Click the blue "Start new meeting" button
- Your video conference will begin without any participants
(see below for inviting attendees)
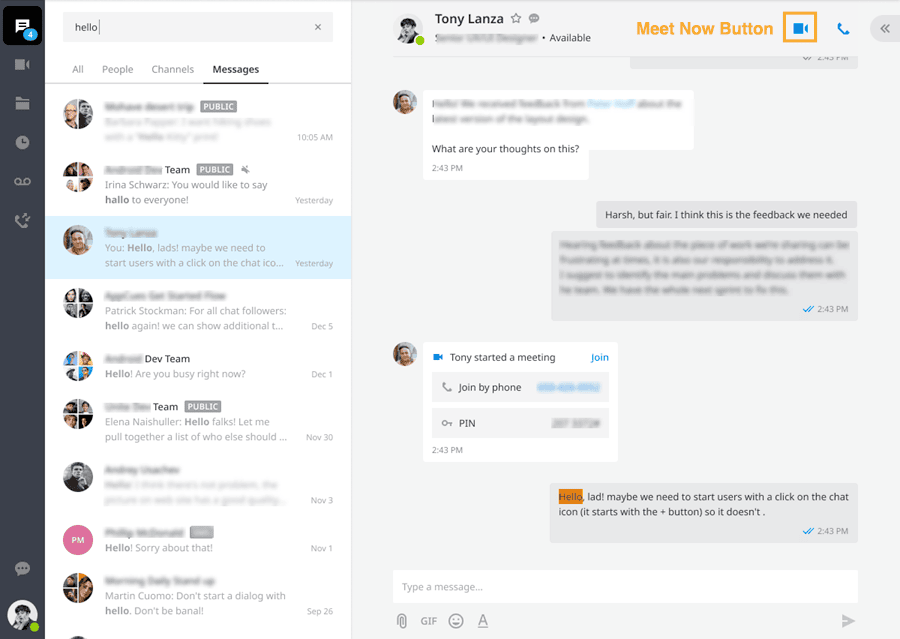
Starting a meeting through chat
Use this when when you want quickly start a meeting with teammates, and they will instantly receive an invitation right through chat.
- Click the chat channel you wish to invite to a video conference – this can be an individual or a group chat
- Click the blue video camera icon on the top of the chat window
- Your video conference will instantly begin
- An invitation link will automatically be sent to everyone in the chat channel
Inviting attendees
You can invite attendees to a meeting after it has already begun.
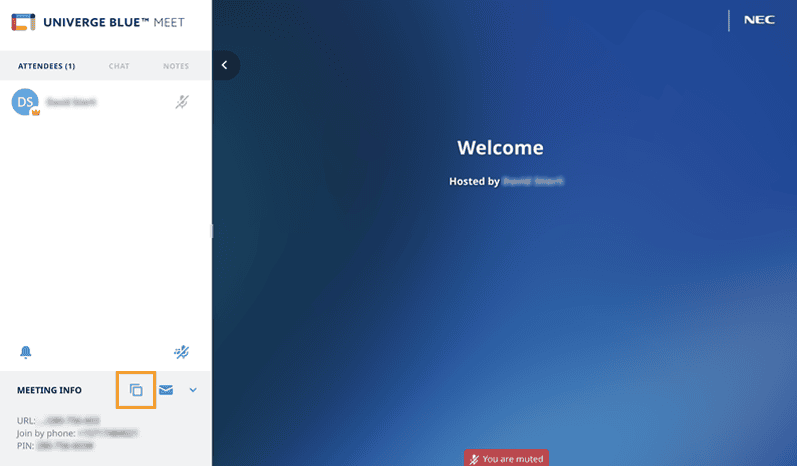
- Click the Meeting info link, in the bottom left-hand corner of the window
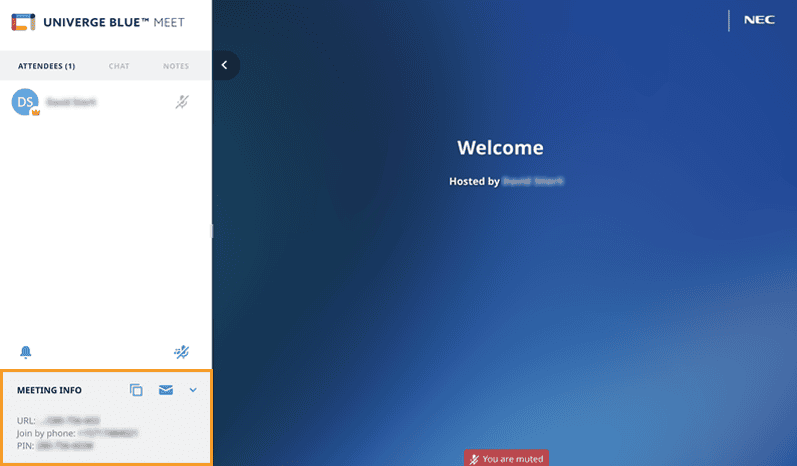
- Click the copy icon, then paste the meeting info into chat, or into an email to invite external participants
Sharing your screen
Screen Sharing features are open to all participants in a meeting and not limited to the meeting host only.
- Click the monitor icon
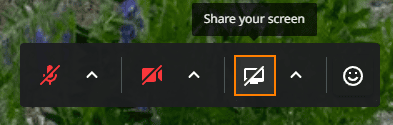
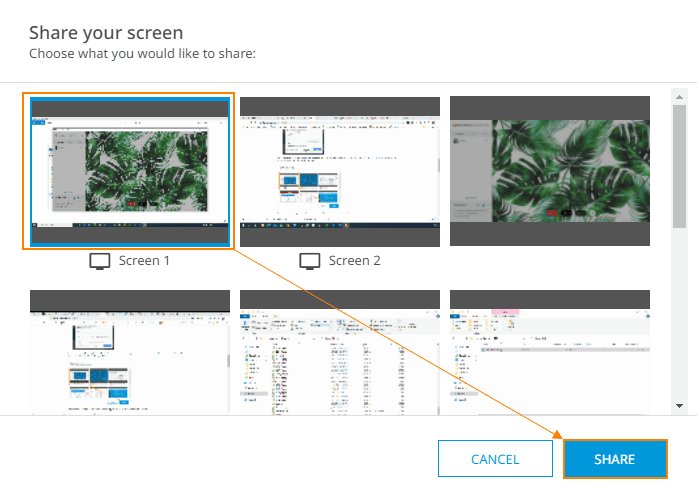
- A pop-up box will display all of your available screens
- Click on the screen you wish to share
- If you have multiple monitors, you can select the specific screen you wish to share
- You can also share a single application window
- Click the blue Share button
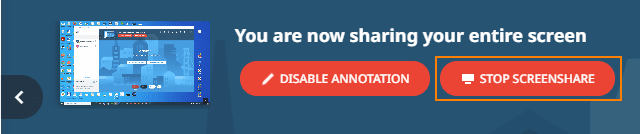
To stop sharing your screen, click the red Stop Screenshare button.
Mute controls
Both the meeting host and the participants have a set of mute controls.
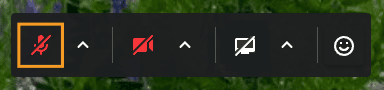
Muting yourself:
- Click the microphone icon to toggle your microphone on or off
- An automated voice will tell you if you are "muted" or "unmuted"
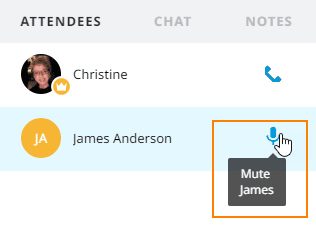
Muting attendees (host feature):
As a host, you have the ability to mute individual or all meeting participants.
- To mute an individual, click the microphone icon next to the attendee's name
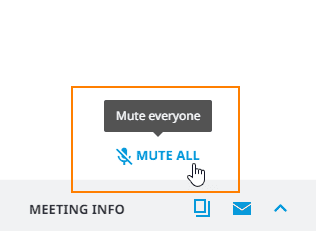
- To mute all attendees, click the "Mute All" button
Note: Attendees may unmute themselves at any time by dialing *6 on their phone
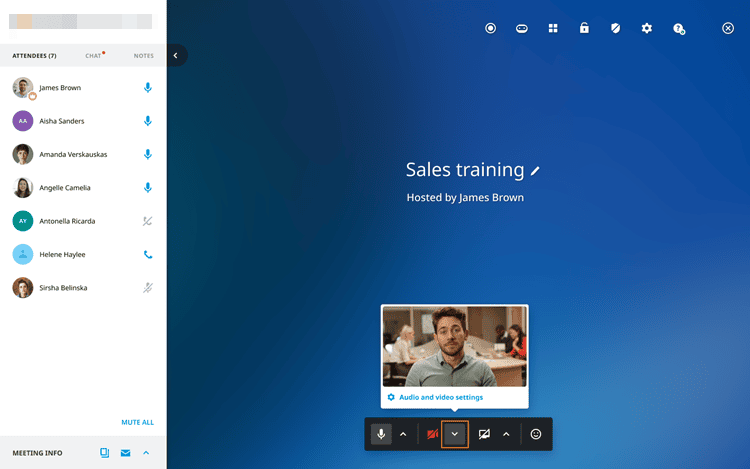
Turn on/off webcam
Click the webcam icon to toggle your webcam on or off during a meeting.
CONFERENCE CALLS
Starting a conference call
Audio conference calls are started the same way as video conference calls. The Univerge Blue application essentially works as a conference bridge.
- Click the video camera icon on the left-hand black sidebar
- Click the blue Start new meeting button
- Your audio conference will begin without any participants
(see below for inviting attendees)
Inviting attendees
- Click the Meeting info link, in the bottom left-hand corner of the window
- Click the copy icon, then paste the meeting info into chat, or into an email to invite external participants
Conference call controls
As a meeting host, you have the following controls available to you by using your phone's keypad during the call.
- Press *4 for a list of commands
- Press *2 to lock your meeting - *2 again to unlock your meeting
- Press *5 to mute all except yourself
- Press *6 to unmute yourself
- Press *9 to record your call - *9 again to stop recording (PRO plans only)
When you use these commands, you will hear an audio announcement confirming the command has been executed.
FILE SHARING
Univerge Blue SHARE overview
Univerge Blue Share allows for a better collaborative experience across your team.
Use Share to access, manage, store, and share files safely and securely with
anyone inside or outside your organization.
anyone inside or outside your organization.
It's a great tool for sending large files to colleagues, without the need to clutter your email with large attachments. You can also use it as a replacement for an FTP client, and allow outside vendors and partners to upload files to you – all while controlling restrictions and password protection.

Uploading files
- Click the share (folder) icon on the left-hand black sidebar
- Click the "My Blue Share" button
- Click the "Upload" button or drag and drop a file directly into the application
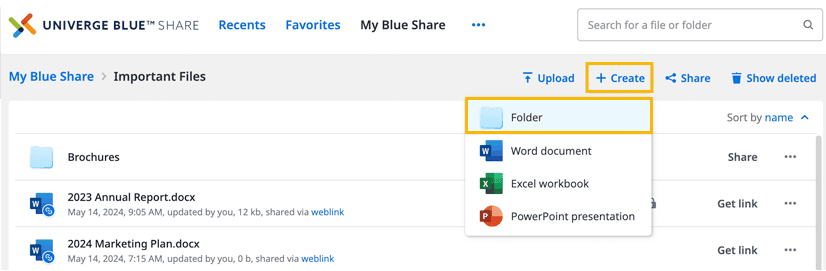
- To organize your files, you can click the "+ Create" button to create folders

Collaborating with teammates
Sharing and collaborating with other Connect users is easy!
Create a shared folder
A shared folder is a folder which you can share with other Connect users. When you share a folder with a teammate, they will see the folder within their SHARE application. You control what these users can do with the files, such as modify or view only.
- Click the "+ Create" button
- Select "Folder" from the menu
- Click the "+ Create" button
- Select "Folder" from the menu
- Name the folder and click Create
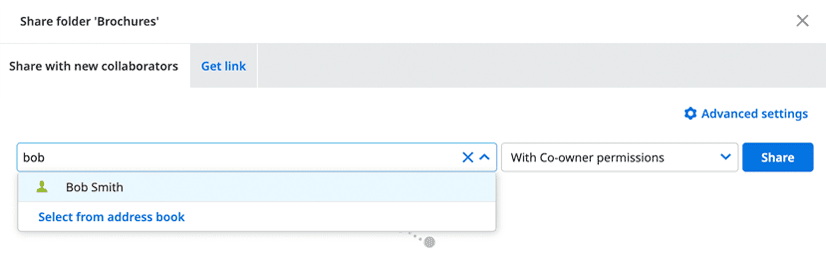
- Click the word "Share" to the right of the folder

- A pop-up box will open
- Use the dropdown menu select all of the users you wish to share the folder with
- Use the permissions dropdown menu to specify what these users can do with the files and folders contained inside this shared folder (co-owner, modify, view-only)
- Click Share
- The users you selected will see an invitation to your shared folder, the next time they access Univerge Blue Share
Sharing files via web links
A web link is a link to your file that you can send to external contacts. Rather than attaching a file to an email, you can simply email the web link. And if you make changes to the file, people with the web link will always have access to see the latest version.
- Navigate to the file you wish to share
- Click the "Get link" button to the right of the file

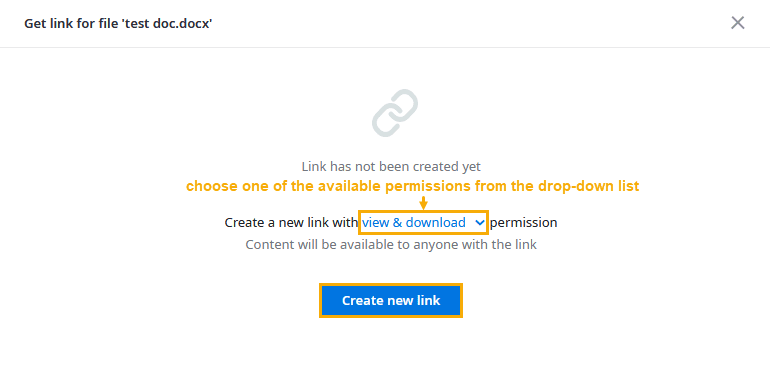
- A pop-up box will open
- By default, people with the web link will be able to view & download the file – If you wish to restrict them to view only, click the blue link that says "View & download" and change it to "View only"
- Click the "Create new link" button
- The link will be created with the name "Web link"
- Click the "Copy link" button to copy the link's URL
- Close the pop-up box
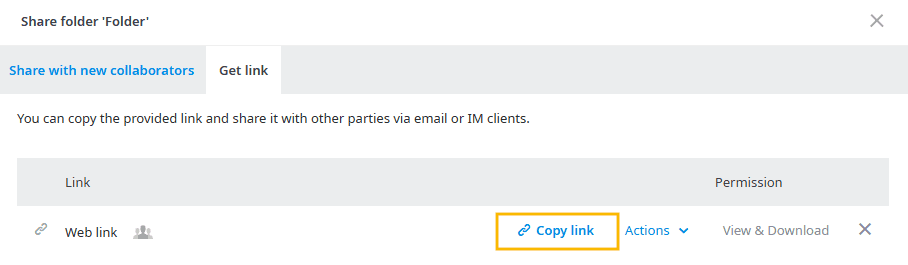
Once a web link has been created, you can come back and copy it anytime, by clicking the "Get link" button.
Files can also have multiple web links, with different sets of permissions.
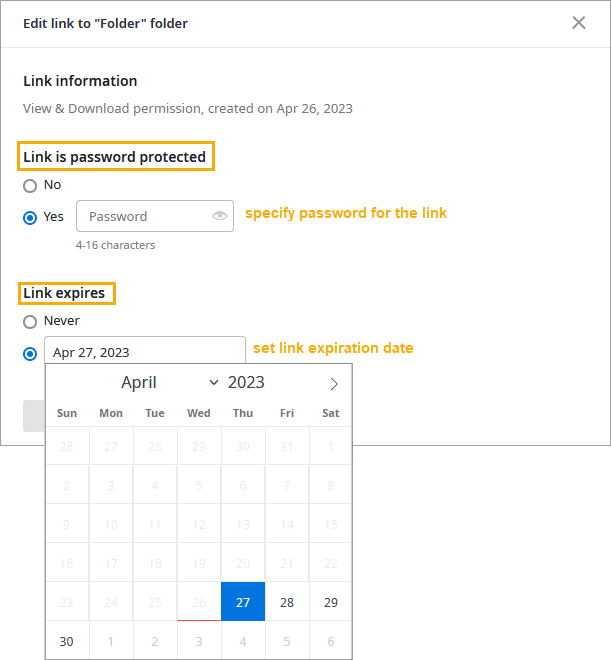
Password protecting web links
To add another layer of security, you can password protect a web link.
- Follow the steps above to create a web link OR click the "Get link" button next to a file
- A pop-up box will open
- Next to the web link, click the "Actions" button
- Choose "Edit link settings" from the menu
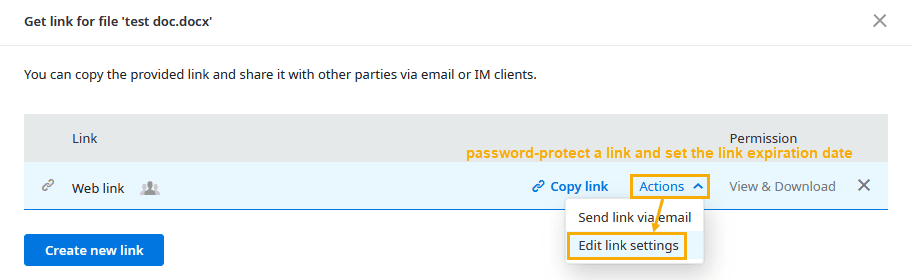
- A new pop-up box will open
- Under the submenu "Link is password protected", click the checkbox next to YES
- Define your password (4-16 characters)
- You can also set an expiration date for the web link
Silent mode
Silent mode is a helpful feature for users who do not want to be disturbed by calls, voicemails, messages, or missed call notifications outside of work hours.
Silent mode can be set manually or by schedule.
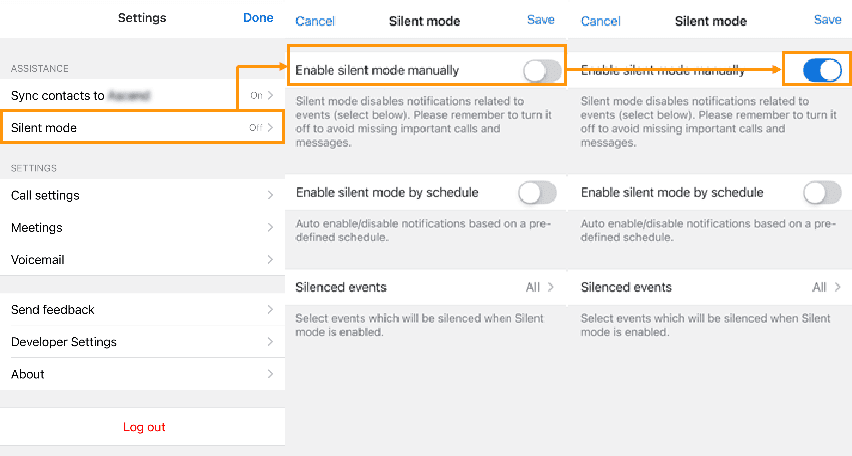
Manual silent mode
- Tap on your avatar, in the top corner of the screen
- Tap "Settings"
- Tap "Silent mode"
- Tap the toggle button next to "Enable silent mode manually"
- Your app will remain in silent mode until you manually disable it
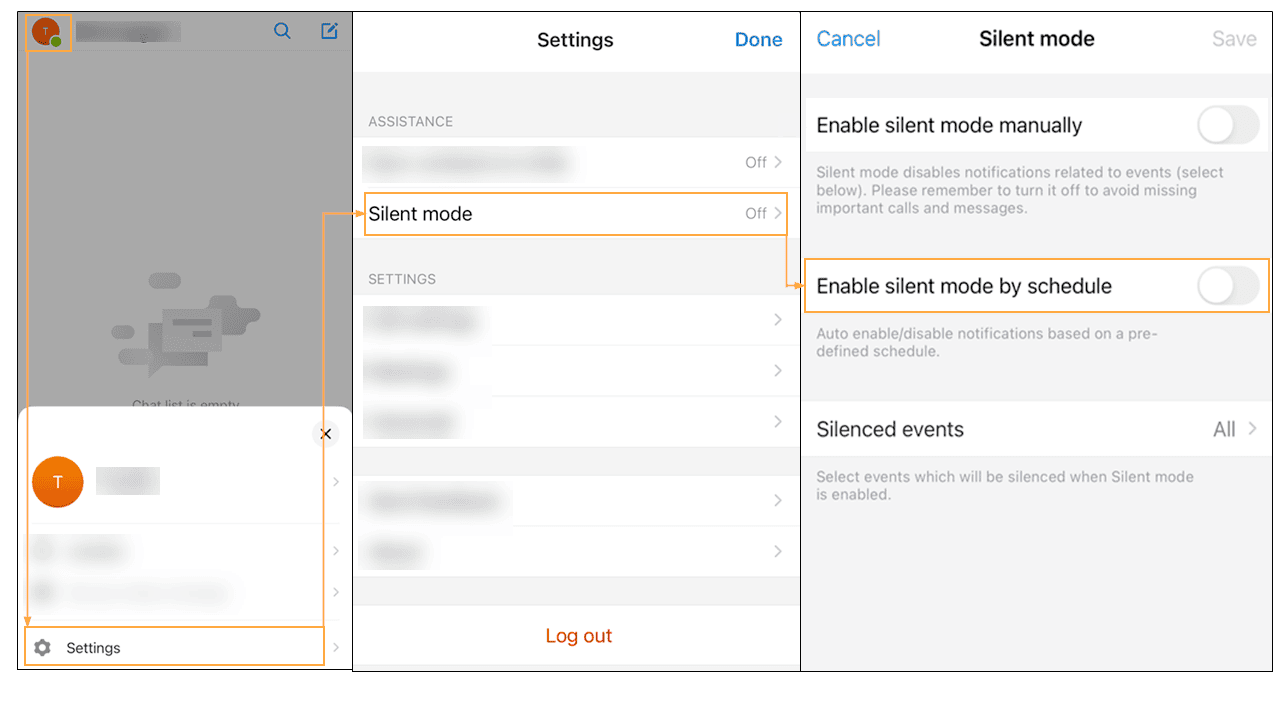
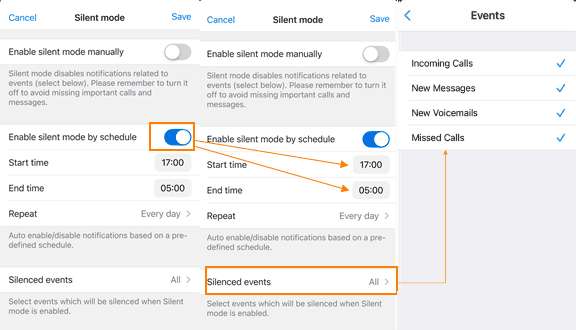
Scheduled silent mode
- Tap on your avatar, in the top corner of the screen
- Tap "Settings"
- Tap "Silent mode"
- Tap the toggle button next to "Enable silent mode by schedule"
- Set your preferred start time, end time, and days
- Silent mode will automatically enable itself during this schedule, and disable itself outside of the schedule
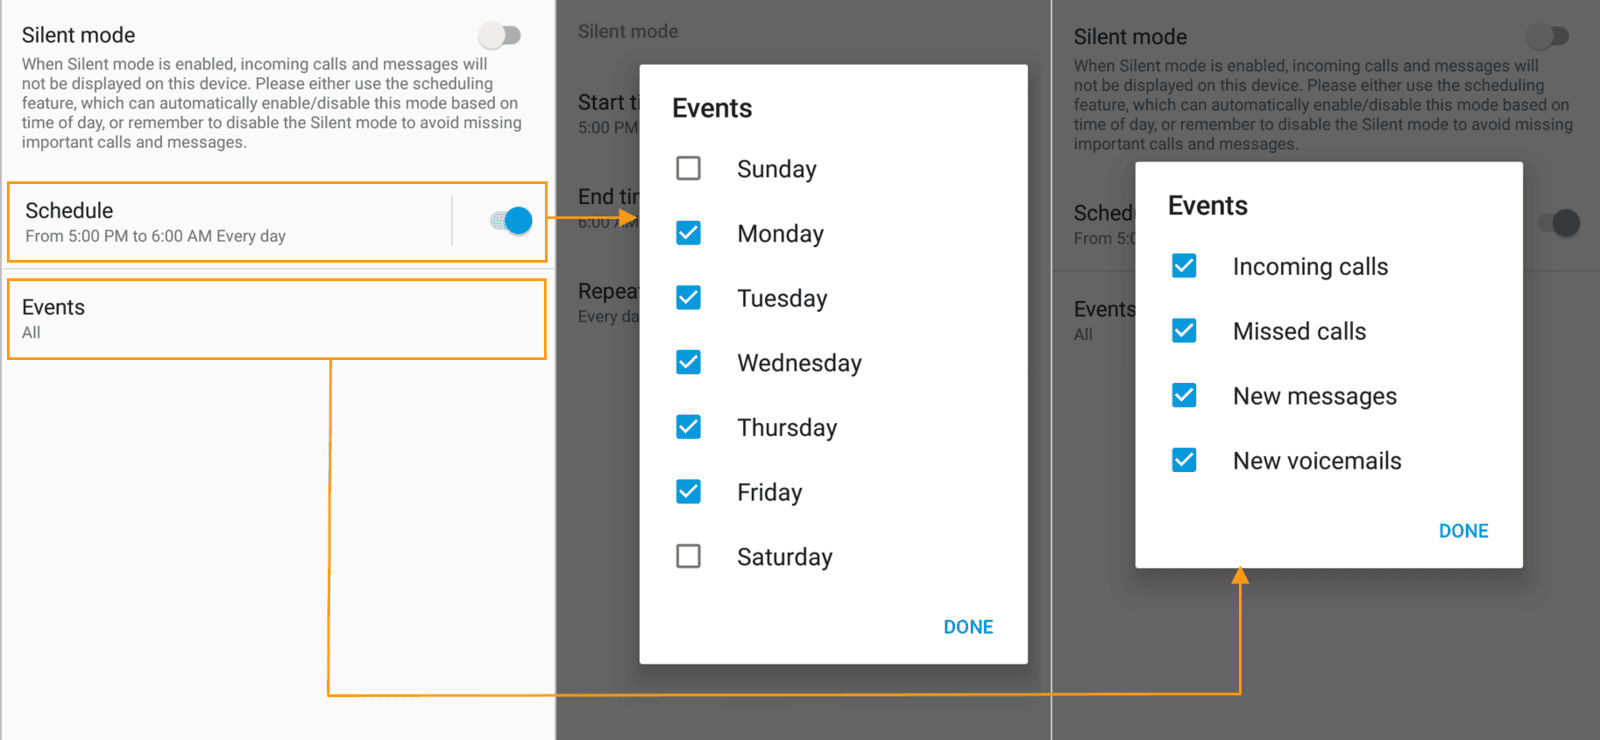
Silenced events
You can even define the types of events you wish to silence, while in silent mode. For instance, you may wish to silence team chat messages, but still want to receive an a notification when you receive a new call or voicemail.
- Tap on "Silenced events"
- Tap a checkmark next to the event you wish to silence
Some features may require a Connect PRO or PRO PLUS plan.